Archive for the ‘网络相关’ Category
分享50个你进去就出不来的网站,重塑你的世界观
星期日, 6 9 月, 20261.看此刻的地球
http://zoom.earth 卫星实时图像
http://flightradar24.com 天上所有飞机
http://marinetraffic.com 海上所有船
http://windy.com 风和风暴的实时地图
http://lightningmaps.org 全球闪电落地实况
http://earthquake.usgs.gov 最新地震列表
http://worldometers.info 世界数据逐秒跳动
2.换个地方待一会儿
http://window-swap.com 从陌生人的窗户往外看
http://mapcrunch.com 随机传送到地球任意一点
http://virtualvacation.us 城市虚拟漫步
http://atlasobscura.com 世界上最奇怪的地方目录
3.地图和尺度
http://thetruesize.com 拖动国家比较真实大小
http://submarinecablemap.com 撑起互联网的海底电缆
http://oldmapsonline.org 几百年前的地图
http://davidrumsey.com 15 万张历史地图
http://openstreetmap.org 志愿者画出来的世界
4.宇宙
http://eyes.nasa.gov 3D 漫游太阳系
http://stellarium-web.org 浏览器里的真实星图
http://apod.nasa.gov NASA 每日天文照片
http://images.nasa.gov NASA 全部图像档案,免费
http://htwins.net/scale2 从原子到宇宙的尺度之旅
5.数据和可视化
http://ourworldindata.org 基于真实数据的世界现状
http://pudding.cool 用数据讲的视觉长文
http://informationisbeautiful.net 复杂数据可视化
http://gapminder.org 我们对世界的误解有多深
http://data.worldbank.org 世界银行开放数据
http://observablehq.com 用实时代码做可视化
http://pudding.cool 是这一栏的天花板,每篇都是一个小型作品。
6.读不完的东西
http://archive.org 数百万书籍影像软件
http://gutenberg.org 7 万本版权过期的免费书
http://openlibrary.org 世界上每本书的记录
http://loc.gov 美国国会图书馆数字档案
http://arxiv.org 科学论文免费预印本
7.博物馆和艺术
http://artsandculture.google.com 在家逛世界各大博物馆
http://rijksmuseum.nl 高清艺术作品可下载
http://metmuseum.org 大都会开放藏品
http://wikiart.org 25 万件艺术作品
http://publicdomainreview.org 被历史遗忘的视觉宝藏
http://europeana.eu 欧洲文化遗产档案
8.声音
http://radiooooo.com 选个国家和年代,听那个时代的音乐
http://musicmap.info 音乐流派的族谱树
http://listen.hatnote.com 把维基百科的实时编辑变成声音
radiooooo 选 1970 年代的巴西试试。
9.杂项
http://neal.fun 互动式知识小实验
http://sciencedaily.com 科学新闻实时流
http://timeanddate.com 时间、日出和天象
http://neal.fun 里的每一个小项目都能占掉你半小时。
Posted in 网络相关 | 分享50个你进去就出不来的网站,重塑你的世界观已关闭评论
Debian12 换源(更新依赖)
星期四, 12 6 月, 2025我们需要打开源文件:/etc/apt/sources.list ,你可以使用nano编辑或者ssh软件自带的文件管理功能修改文件。
粘贴到sources.list文件内后保存,然后调用命令:sudo apt update 重新拉一下索引文件。
然后就可以使用sudo apt-get upgrade更新依赖了。
中科大源:
deb https://mirrors.ustc.edu.cn/debian/ bookworm main contrib non-free non-free-firmware deb-src https://mirrors.ustc.edu.cn/debian/ bookworm main contrib non-free non-free-firmware deb https://mirrors.ustc.edu.cn/debian/ bookworm-updates main contrib non-free non-free-firmware deb-src https://mirrors.ustc.edu.cn/debian/ bookworm-updates main contrib non-free non-free-firmware deb https://mirrors.ustc.edu.cn/debian/ bookworm-backports main contrib non-free non-free-firmware deb-src https://mirrors.ustc.edu.cn/debian/ bookworm-backports main contrib non-free non-free-firmware deb https://mirrors.ustc.edu.cn/debian-security/ bookworm-security main contrib non-free non-free-firmware deb-src https://mirrors.ustc.edu.cn/debian-security/ bookworm-security main contrib non-free non-free-firmware
阿里源:
deb https://mirrors.aliyun.com/debian/ bookworm main non-free non-free-firmware contrib deb-src https://mirrors.aliyun.com/debian/ bookworm main non-free non-free-firmware contrib deb https://mirrors.aliyun.com/debian-security/ bookworm-security main deb-src https://mirrors.aliyun.com/debian-security/ bookworm-security main deb https://mirrors.aliyun.com/debian/ bookworm-updates main non-free non-free-firmware contrib deb-src https://mirrors.aliyun.com/debian/ bookworm-updates main non-free non-free-firmware contrib deb https://mirrors.aliyun.com/debian/ bookworm-backports main non-free non-free-firmware contrib deb-src https://mirrors.aliyun.com/debian/ bookworm-backports main non-free non-free-firmware contrib
腾讯源:
deb https://mirrors.tencent.com/debian/ bookworm main non-free non-free-firmware contrib deb-src https://mirrors.tencent.com/debian/ bookworm main non-free non-free-firmware contrib deb https://mirrors.tencent.com/debian-security/ bookworm-security main deb-src https://mirrors.tencent.com/debian-security/ bookworm-security main deb https://mirrors.tencent.com/debian/ bookworm-updates main non-free non-free-firmware contrib deb-src https://mirrors.tencent.com/debian/ bookworm-updates main non-free non-free-firmware contrib deb https://mirrors.tencent.com/debian/ bookworm-backports main non-free non-free-firmware contrib deb-src https://mirrors.tencent.com/debian/ bookworm-backports main non-free non-free-firmware contrib
Posted in 网络相关 | Debian12 换源(更新依赖)已关闭评论
国内外鸡 安装nezha命令
星期四, 2 1 月, 2025- 从https://github.com/nezhahq/agent/releases下载nezha-agent到本地(版本自行选定),一般来说选择
nezha-agent_linux_amd64.zip的压缩包。 - 解压
nezha-agent_linux_amd64.zip得到nezha-agent的二进制的文件。 - 在VPS上创建
/opt/nezha/agent哪吒探针监控目录,将 nezha-agent 上传至/opt/nezha/agent目录下。 cd /opt/nezha/agent/赋予执行权限:chmod +x nezha-agent- 在VPS的
/etc/systemd/system/目录新建nezha-agent.service文件并修改未接入CDN的面板服务器域名/IP:gRPC 端口 -p Agent 密钥信息为自己的实际信息。
文件内容如下:
[Unit]
Description=哪吒探针监控端
ConditionFileIsExecutable=/opt/nezha/agent/nezha-agent


[Service]
StartLimitInterval=5
StartLimitBurst=10
ExecStart=/opt/nezha/agent/nezha-agent "-s" "域名:端口" "-p" "密码"

WorkingDirectory=/root


Restart=always

RestartSec=120
EnvironmentFile=-/etc/sysconfig/nezha-agent

[Install]
WantedBy=multi-user.target
- 最后执行下面的命令:
systemctl daemon-reload
systemctl enable nezha-agent
systemctl restart nezha-agent
docker run -d -e domain=’域名’ -e port=’5555′ -e secret=’密码’ -e args=” -e platform=’:’ -e version=” –net=’host’ –name=’nezha’ redamancy2319/nezha-agent:latest
Posted in 网络相关 | 国内外鸡 安装nezha命令已关闭评论
安装Nginx Proxy Manager
星期六, 17 6 月, 2023简单安装:
更新环境
apt update -y && apt install -y curl socat wget sudo安装 Docker
curl -fsSL https://get.docker.com | sh安装 Nginx Proxy Manager
来源:
https://github.com/kejilion/docker/blob/main/Nginx%20Proxy%20Manager
一键脚本:
docker run -d \
  --name=npm \
  -p 80:80 \
  -p 81:81 \
  -p 443:443 \
  -v /home/npm/data:/data \
  -v /home/npm/letsencrypt:/etc/letsencrypt \
  --restart=always \
  jc21/nginx-proxy-manager:latest
进入NGINX面板
服务器IP加81端口访问网页
用户
密码
changeme
手动安装:
重装
bash <(wget –no-check-certificate -qO- ‘https://moeclub.org/attachment/LinuxShell/InstallNET.sh’) -d 11 -v 64 -a -firmware -p 123456
更新环境
apt update -y && apt install -y curl socat wget sudo
BBR PLUS 四合一脚本
wget -N –no-check-certificate “https://raw.githubusercontent.com/chiakge/Linux-NetSpeed/master/tcp.sh” && chmod +x tcp.sh && ./tcp.sh
安装 Docker
curl -fsSL https://get.docker.com | sh
curl -L “https://github.com/docker/compose/releases/download/v2.18.1/docker-compose-$(uname -s)-$(uname -m)” -o /usr/local/bin/docker-compose
chmod +x /usr/local/bin/docker-compose
创建目录并进入目录
cd /home/
mkdir npm
cd npm
创建docker-compose.yml的文件
nano docker-compose.yml
复制代码进入文件中
version: ‘3.8’
services:
app:
image: ‘jc21/nginx-proxy-manager:latest’
restart: unless-stopped
ports:
– ’80:80′
– ’81:81′
– ‘443:443’
volumes:
– ./data:/data
– ./letsencrypt:/etc/letsencrypt
crl+x 然后y 然后回车退出编辑模式
启动
docker-compose up -d
默认用户名密码
Email: [email protected]
Password: changeme
Posted in 网络相关 | 安装Nginx Proxy Manager已关闭评论
在 TG 中获取搬瓦工 vps 信息
星期二, 13 6 月, 2023利用搬瓦工的 api 和 pyrogram,即可在任意对话中获取 vps 的信息。
安装 python3 和 pyrogram
apt install python3 python3-pip
pip3 install -U pyrogram tgcrypto requests
脚本代码:
#!/usr/bin/env python3
#-*-coding:utf-8-*-

import os
import time
import requests
from pyrogram import Client, filters

# 在搬瓦工后台获取 veid 和 api_key
veid = '0000000'
api_key = 'private_1234567890zxcvbn'

# 在 https://my.telegram.org/ 登入自己的 tg 账号申请 api_id、api_hash
api_id = '00000000'
api_hash = '1234567890zxcvbnm'

def bwh_info():
  LiveServiceInfo = requests.get(url=f'https://api.64clouds.com/v1/getLiveServiceInfo?veid={veid}&api_key={api_key}')
  node_datacenter = LiveServiceInfo.json()['node_datacenter']
  ve_status = LiveServiceInfo.json()['ve_status']
  load_average = LiveServiceInfo.json()['load_average']
  mem_available = str(LiveServiceInfo.json()['mem_available_kb'] / 1000)
  plan_ram = str(LiveServiceInfo.json()['plan_ram'] / 1024 / 1024)
  ve_used_disk_space = str(round(LiveServiceInfo.json()['ve_used_disk_space_b'] / 1024 / 1024 / 1024,2))
  ve_disk_quota_gb = LiveServiceInfo.json()['ve_disk_quota_gb']
  monthly_data_multiplier = LiveServiceInfo.json()['monthly_data_multiplier']
  data_counter = str(round(LiveServiceInfo.json()['data_counter'] * monthly_data_multiplier / 1024 / 1024 / 1024,2))
  plan_monthly_data = str(round(LiveServiceInfo.json()['plan_monthly_data'] / 1024 / 1024 / 1024,2))
  data_next_reset = time.strftime("%Y-%m-%d", time.localtime(LiveServiceInfo.json()['data_next_reset']))
  text = f'**{node_datacenter}**\n\n'
  text += f'状态:`{ve_status},{load_average}`\n'
  text += f'内存(可用):`{mem_available}/{plan_ram}MB`\n'
  text += f'硬盘(已用):`{ve_used_disk_space}/{ve_disk_quota_gb}GB`\n'
  text += f'流量(已用):`{data_counter}/{plan_monthly_data}GB`\n'
  text += f'流量重置日期:`{data_next_reset}`\n'
  return text

app = Client(f'{os.path.dirname(os.path.abspath(__file__))}/{os.path.splitext(os.path.basename(__file__))[0]}', api_id=api_id, api_hash=api_hash)

@app.on_message(filters.me & ~filters.forwarded & filters.command('bwh', prefixes='/'))
async def hello(client, message):
  await message.edit_text("获取中...")
  await message.edit_text(bwh_info())

app.run()
将以上内容保存为脚本如 bwh.py,然后运行、按照提示登录即可。
Posted in 网络相关 | 在 TG 中获取搬瓦工 vps 信息已关闭评论
激活win10/11
星期二, 9 5 月, 2023Posted in 网络相关 | 激活win10/11已关闭评论
VPS常用测试脚本
星期四, 9 3 月, 2023YABS
curl -sL yabs.sh | bash
三网测速
bash <(curl -Lso- https://git.io/superspeed.sh)
bench.sh
wget -qO- bench.sh | bash
Geekbench
curl -sL yabs.sh|bash -s -- -if
Hyperspeed
bash <(curl -Lso- https://bench.im/hyperspeed)
融合怪
bash <(wget -qO- --no-check-certificate https://gitlab.com/spiritysdx/za/-/raw/main/ecs.sh)
Warp
wget -N https://raw.githubusercontent.com/fscarmen/warp/main/warp-go.sh && bash warp-go.sh
Warp2
bash <(curl -sSL https://raw.githubusercontent.com/fscarmen/tools/main/warp_crontab.sh)
Yabs
curl -sL yabs.sh | bash
三网测速
bash <(curl -Lso- https://www.infski.com/files/superspeed.sh)
流媒体检测
bash <(curl -L -s https://raw.githubusercontent.com/lmc999/RegionRestrictionCheck/main/check.sh)全能怪
echo 1 | bash <(wget -qO- --no-check-certificate https://github.com/spiritLHLS/ecs/raw/main/ecs.sh)回程路由测试
wget –no-check-certificate https://tutu.ovh/bash/returnroute/route && chmod +x route && ./route
curl https://raw.githubusercontent.com/zhanghanyun/backtrace/main/install.sh -sSf | sh
从你的 Linux(X86/ARM)/Mac/BSD 系统环境下发起 traceroute 请求,附带链路可视化,兼容性更好,支持 JSON 格式
#下载
https://cdn.ipip.net/17mon/besttrace4linux.zip
#解压
unzip besttrace4linux.zip
#使用
./besttrace -q 1 这里是目标IP
Posted in 网络相关 | VPS常用测试脚本已关闭评论
极光面板
星期四, 2 2 月, 2023项目地址:GitHub – Aurora-Admin-Panel/deploy: 一个多服务器端口租用管理面板
使用一键脚本安装后按如下设置:
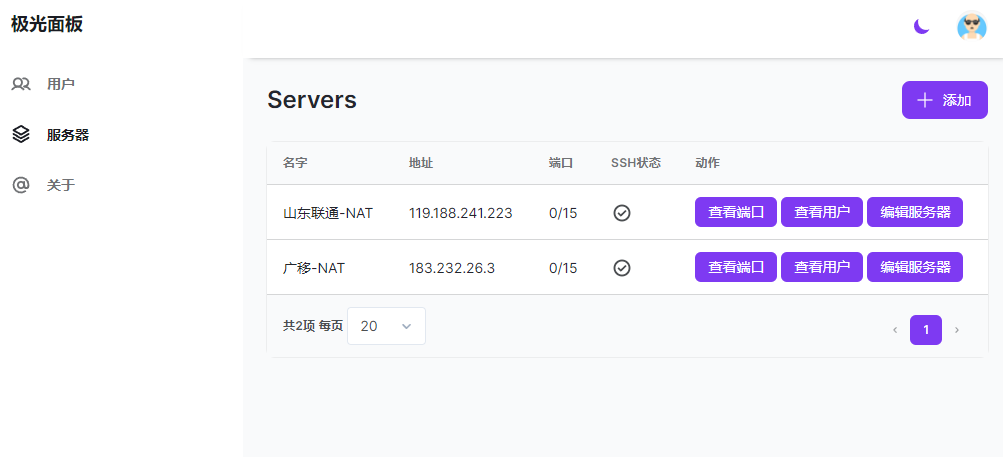
服务器管理页面
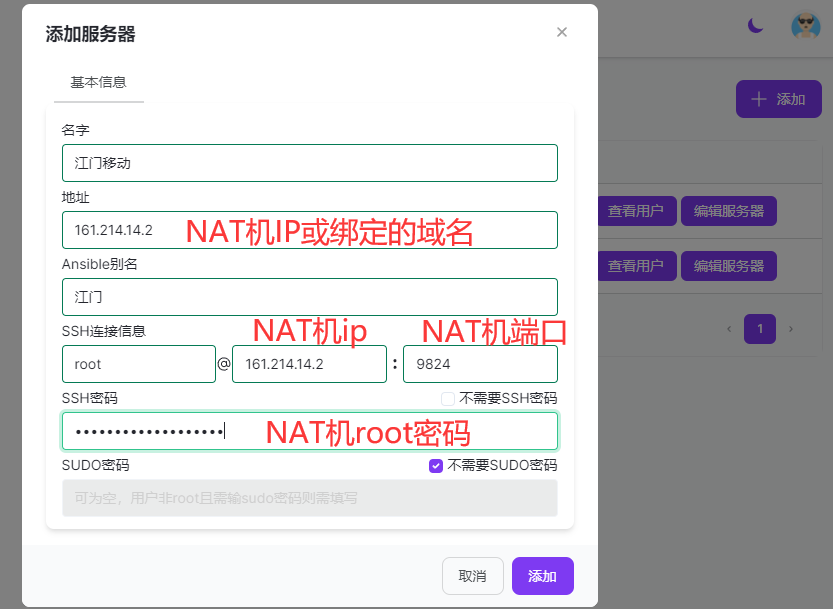
修改/添加服务器
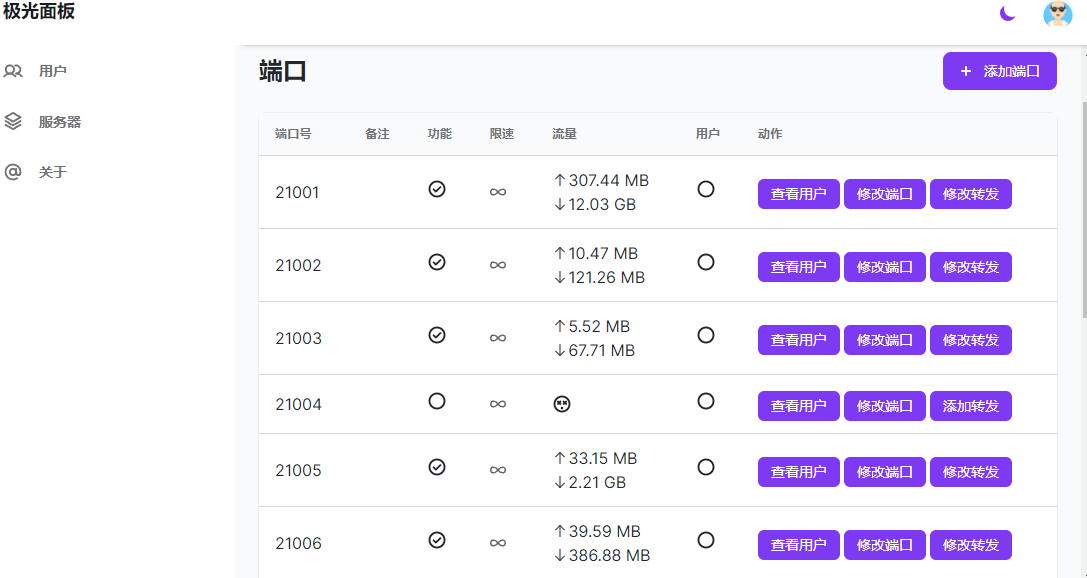
服务器端口管理页面
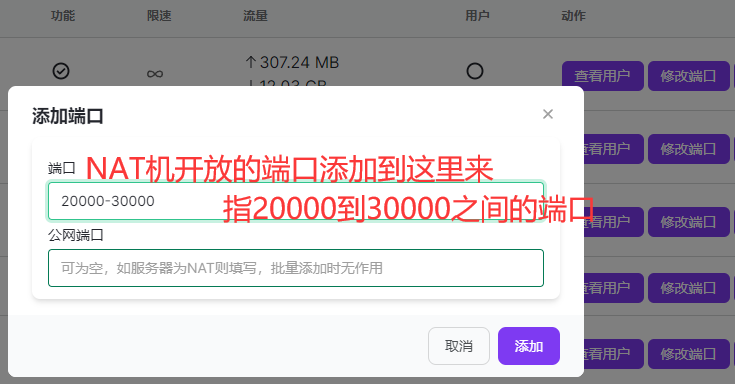
添加/编辑端口
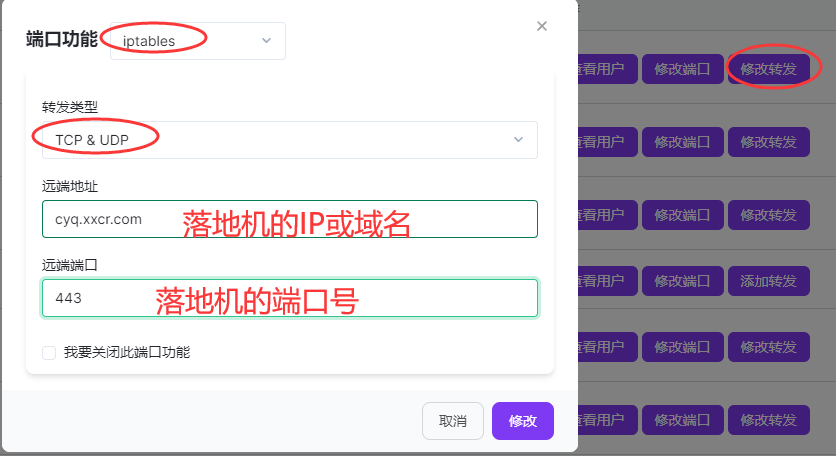
端口设置 iptables
端口设置 GOST
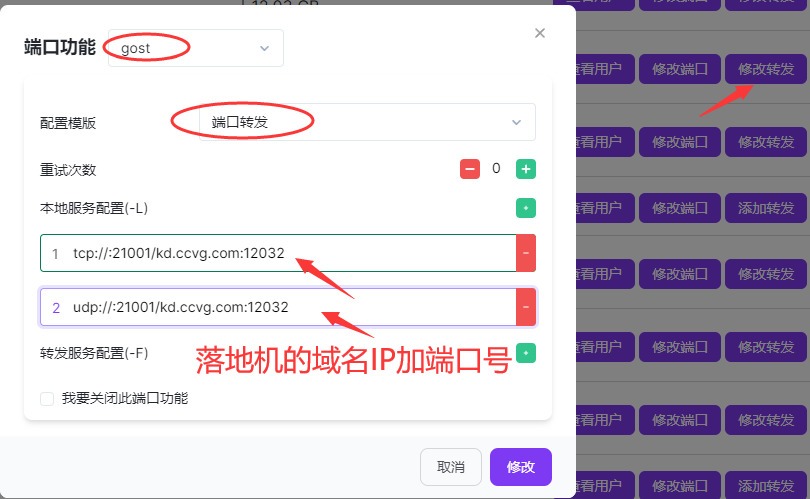
以上便是全部设置方法
Posted in 网络相关 | 极光面板已关闭评论
Acme 脚本申请SSL证书保姆级教程
星期一, 30 1 月, 2023Acme 脚本申请证书
Acme 脚本申请证书,是我们用到的最常见的一种证书的申请方式,它有很多的申请方法,大家只需要找到一种适合自己的也就好了。
不管用下面的何种方式申请,都需要安装 Acme,有一部分的申请场景需要用到相关的插件,所以我们需要提前安装。
下面环境的安装方式,大家根据自己的系统选择命令安装就好了:
- CentOS 命令
 yum update -y          #更新系统

 yum install -y curl    #安装curl

 yum install -y socat    #安装socat
- Debian/Ubuntu 命令
 apt update -y          #更新系统

 apt install -y curl    #安装curl

 apt install -y socat    #安装socat
- 安装 Acme 脚本
1.
curl https://get.acme.sh | sh如果提示It is recommended to install crontab first. try to install ‘cron, crontab, crontabs or vixie-cron’运行
apt-get install cron从 acme.sh v 3.0.0 开始,acme.sh 使用 Zerossl 作为默认 ca,您必须先注册帐户(一次),然后才能颁发新证书。
具体操作步骤如下:
2.、执行
~/.acme.sh/acme.sh --register-account -m [email protected]3、其他的命令暂时没有变动
- 80 端口空闲的验证申请
如果你还没有运行任何 web 服务, 80 端口是空闲的, 那么 Acme.sh 还能假装自己是一个 WebServer, 临时监听在 80 端口, 完成验证
~/.acme.sh/acme.sh --issue -d 你的域名 --standalone- Nginx 的方式验证申请
这种方式需要你的服务器上面已经部署了 Nginx 环境,并且保证你申请的域名已经在 Nginx 进行了 conf 部署。(被申请的域名可以正常被打开)
~/.acme.sh/acme.sh --issue -d 你的域名 --nginx- http 的方式验证申请
这种方式需要你的服务器上面已经部署了网站环境。(被申请的域名可以正常被打开)
原理:Acme 自动在你的网站根目录下放置一个文件, (这个文件可以被互联网访问)来验证你的域名所有权,完成验证. 然后就可以生成证书了.
实例代码:(后面的路径请更改为你的 网站根目录 绝对路径 )
~/.acme.sh/acme.sh --issue -d 你的域名 --webroot /www/wwwroot/你的域名/- 4.安装证书到指定文件夹
注意, 默认生成的证书都放在安装目录下: ~/.acme.sh/ , 请不要直接使用此目录下的证书文件。 正确的使用方法是使用 –install-cert 命令,并指定目标位置, 然后证书文件会被copy到相应的位置,比如下面的代码
~/.acme.sh/acme.sh --installcert -d 你的域名 --key-file /root/private.key --fullchain-file /root/cert.crt上面的 /root/private.key 以及 /root/cert.crt 是把密钥和证书安装到 /root 目录,并改名为 private.key 和 cert.crt
更新证书
目前证书在 60 天以后会自动更新, 你无需任何操作. 今后有可能会缩短这个时间, 不过都是自动的, 你不用关心.
- 5.更新 Acme 脚本
升级 Acme.sh 到最新版本
~/.acme.sh/acme.sh --upgrade如果你不想手动升级, 可以开启自动升级:
~/.acme.sh/acme.sh --upgrade --auto-upgrade之后, acme.sh 就会自动保持更新了.
Posted in 网络相关 | Acme 脚本申请SSL证书保姆级教程已关闭评论
VPS流媒体解锁检测
星期三, 25 1 月, 2023今天分享一个基本覆盖全球热门区域范围内的主流流媒体解锁查询一键脚本,满足大家检测购买的VPS是否支持流媒体解锁和支持哪些地区的流媒体解锁需求。
一键脚本:
bash <(curl -L -s https://git.io/JRw8R)
只检测IPv4结果:bash <(curl -L -s https://git.io/JRw8R) -M 4
只检测IPv6结果:bash <(curl -L -s https://git.io/JRw8R) -M 6
指定检测的网卡名称:bash <(curl -L -s https://git.io/JRw8R) -I eth0
选择脚本语言为英文:bash <(curl -L -s https://git.io/JRw8R) -L e
或者直接运行以下Docker命令 (兼容ARM架构)docker run --rm -ti --net=host lmc999/regioncheck && docker rmi lmc999/regioncheck
注意事项:
在执行前请先确保安装了curl,安装命令如下:
Centos:yum install -y curl
Debian/Ubuntu:apt install -y curl
Posted in 网络相关 | VPS流媒体解锁检测已关闭评论